Not one of mine but probably one of the most impressive amateur carvings I have seen. So over to Mick
John kindly asked whether I would write a short article on how I accomplished a carving of a White Tailed Eagle. The following is my attempt, although apologies to readers if found to be rather lengthy.
White Tailed Eagle
The idea for this carving was born when I had a superb weeks walking on the Island of Mull, where I was fortunate enough to witness the sight of a pair of majestic eagles circling the cliffs.
The White Tailed Eagle (Haliaeetus albicilla) is also known as the Grey Sea Eagle or the White Tailed Fish Eagle. It is the fourth largest eagle in the world; its wingspan at maturity can be up to 200-245cm (over 8 feet wide). They are also known ‘flying barn doors’ because of this phenomenal wingspan.
From a RSPB magazine I chose the following impressive photo to form the basis of my carving and decided to mount it within a bowl carved with a representative mountain scene.
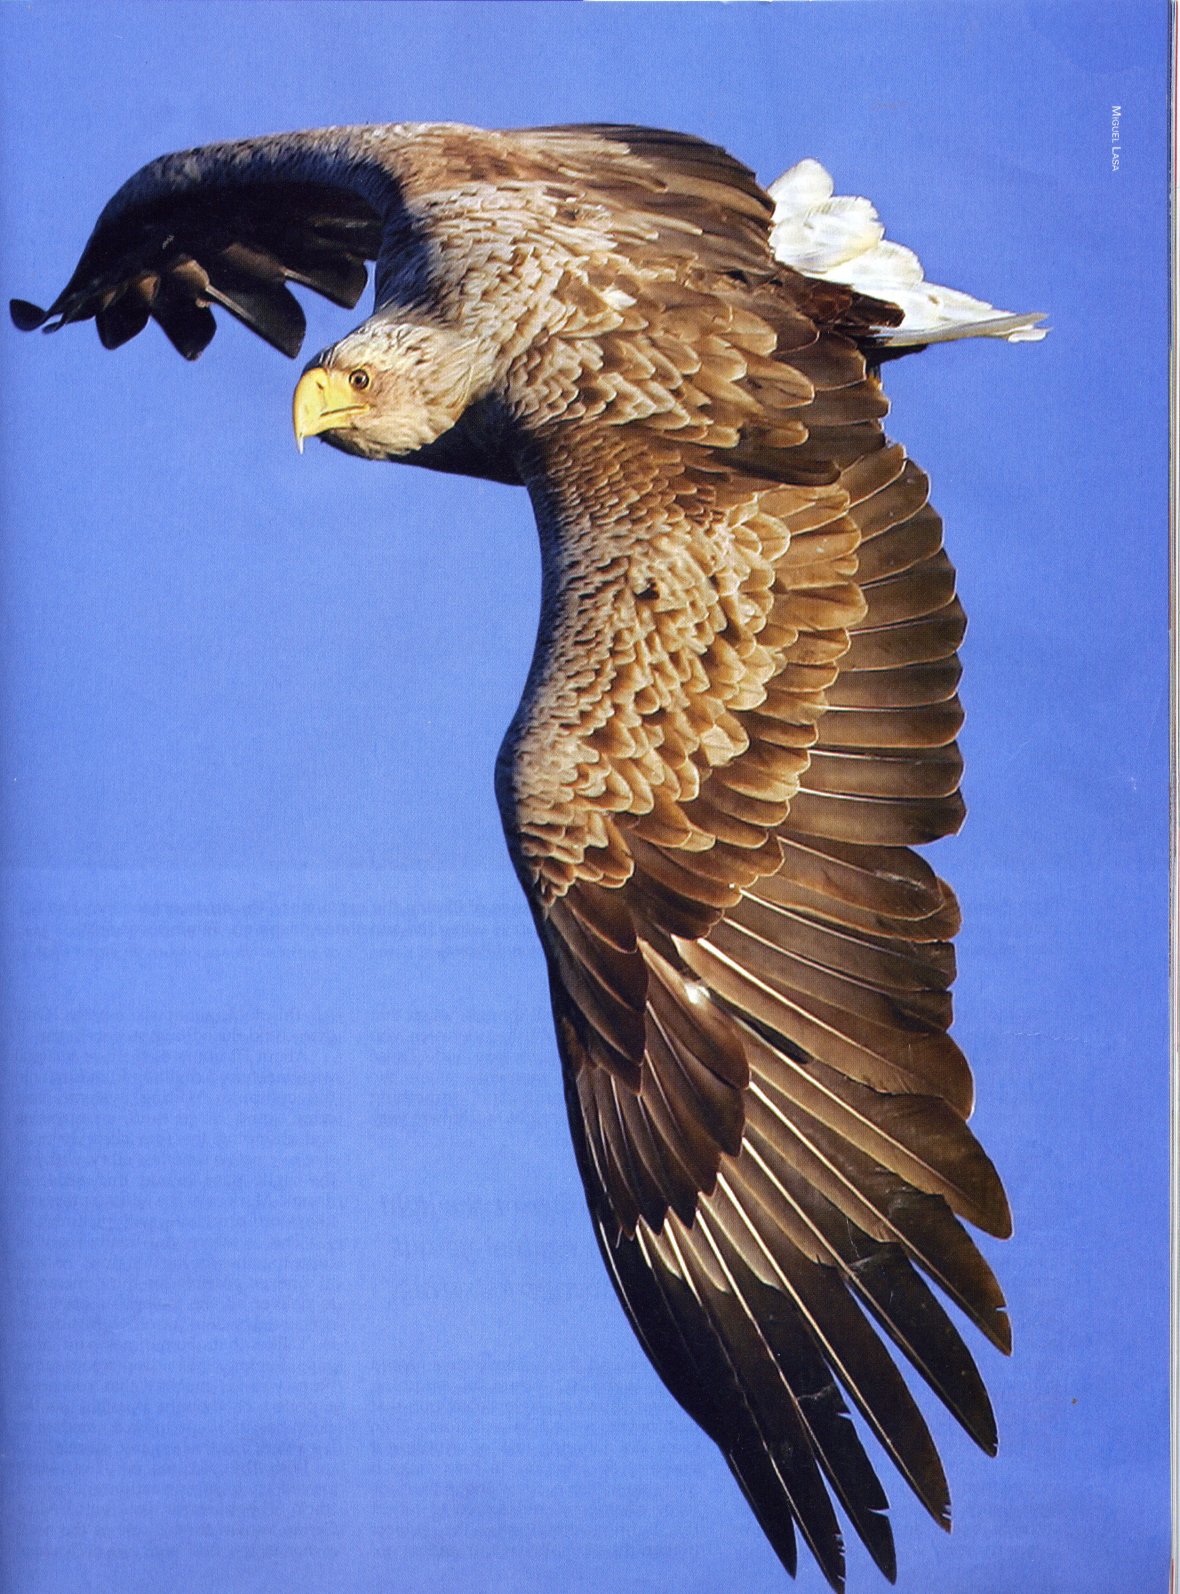
Haliaeetus albicilla
Ack: – RSPB
I chose elm for the bowl, which proved hard work compared to my usual lime, but after finding a gouge with just the right sweep to match the curvature of the sky the scene evolved quite quickly. After an application of methylated spirits to help to identify imperfections in the sky and a little sanding I rounded the bowl edges and took the mountains out to the periphery


A start is made Using the largest tool available helped no end


The rocky cliff extended to the edge of the background and sky blemishes identified through the use of Methylated spirits
I next turned my attention to completing a plasticene maquette of the proposed eagle. Its purpose was to provide a guide as to overall size, points of subsequent adhesion and the form of the difficult left wing. The detail of feathers etc. was not considered necessary at this stage.

The maquette offered up to its background
Lime was chosen and band sawn to give me a starter. To ensure that the left wing nestled snugly into the background chalk was used to assist in identifying those high spots that needed removing.


A snug fit for the left wing? The block created for vice retention


A good start on the wing Establishing the general form
Once happy with the general form a start was made laying in the feathers. The various groupings were identified i.e. coverts, secondaries and primaries before dropping the levels between them and prior to cutting each feather under its neighbour, as in roof tiles. A fluter was used on its side to help create the effect of one feather disappearing under its neighbour, stab cuts were resisted at this stage.

Time was spent in improving the feathers by placing a small convex curve on the leading edge of each one and a concave edge on the other, where it tucked under its adjacent partner.

A start being made to create a convex curve on the underside of the wing


Poor thing looks in agony No, I’m ok

A pause here to ensure the shape of the
primary feathers was correct before cutting
The light eventually dawned on me that as the primary feathers receded from the leading edge so the feather overlap should change i.e. the first should overlap the second and so on but as you reach the back secondary feathers so the overlap needs reversing. The tail feathers were then tackled noting the need to place the centre line slightly offset to allow for perspective.

Primary feathers redrawn for the nth time
It was with extreme trepidation that I cut out the feathers using, at first, a scroll saw and then a coping saw; fortunately, the grain was with me, by design of course!

Primary feathers well on the way
Progress was made in finishing off the left wing, completing the form of the under body and removing considerable wood from beneath the wings. In doing the underside, I had to keep reminding myself to achieve that all-important aerofoil cross-section; this bird of mine was a flyer.
With the tail feathers finalised the holding block was reduced in size, again increasing the visibility of the background. A start was then made to create the feet or should I say claws. Here it was important to treat them just like hands in that I had to identify the knuckles first and take the claws from there.


Further wood removed from the underside A start on the claws

It was important to get the underside of the body correct
i.e. a prominent chest, the source of the eagle’s power
The addition of a few feather marks to each of the leading feathers provided another little extra to their appearance.

 Tail feathers completed & a twist added to the left wing primary feather
 Removal of the last piece of the holding block
The final task was to attach the eagle to the background. Settled on the use of contact glue, but first I had to ensure the mating surfaces were as good as we could possibly get them. Using chalk and a light scraping an acceptable match was achieved between the intended mating surfaces, finally the eagle was glued to its background.
 White Tailed Eagle (145 hrs)
An added bonus, an article in the Woodcarving Magazine Mar/Apr 2008 No 101 followedAck: – GMC
NB This is an abridged version of a record made of this carving to be found in ‘A Diary of a Woodcarver’ Volume 2’ (ISBN 978-178507-130-0), by the author.
