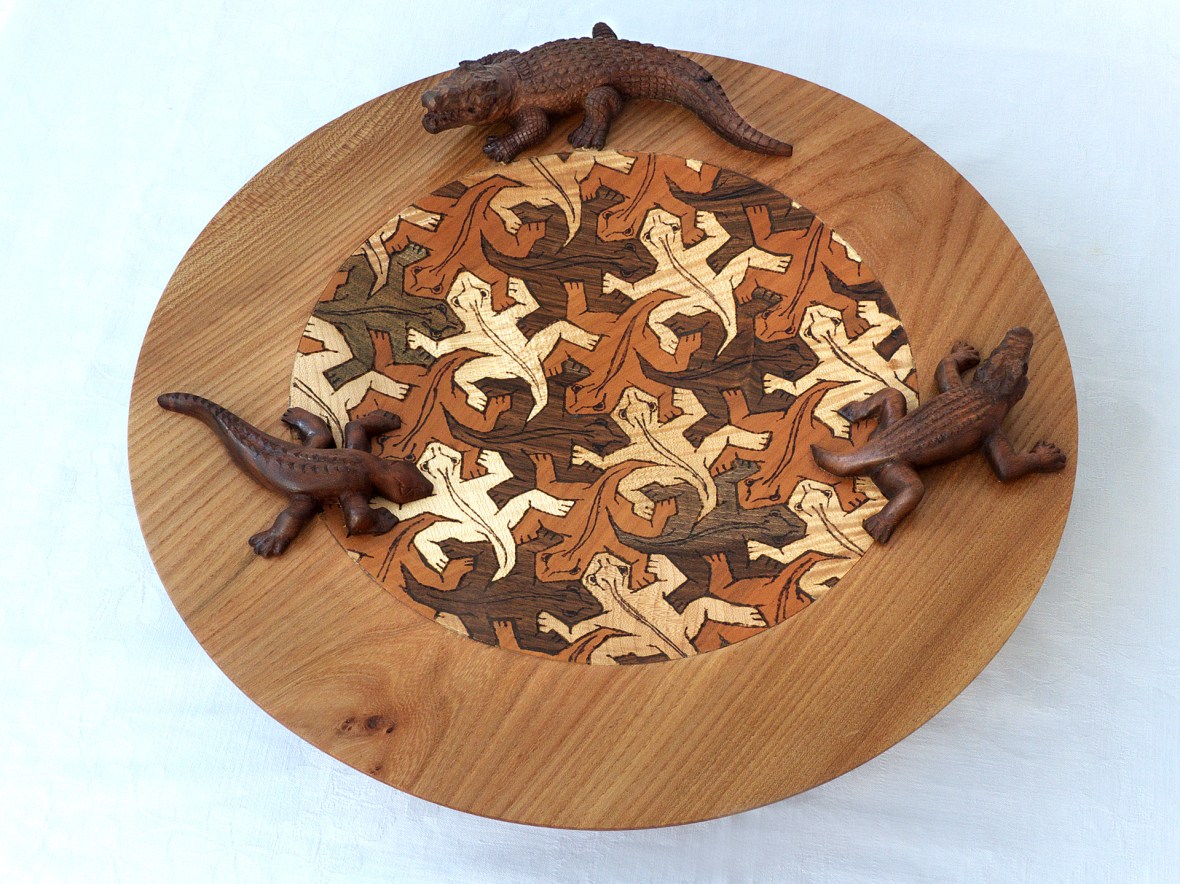
This is a more recent project, completed in 2015, it is certainly the most complex and challenging so far.
Why?
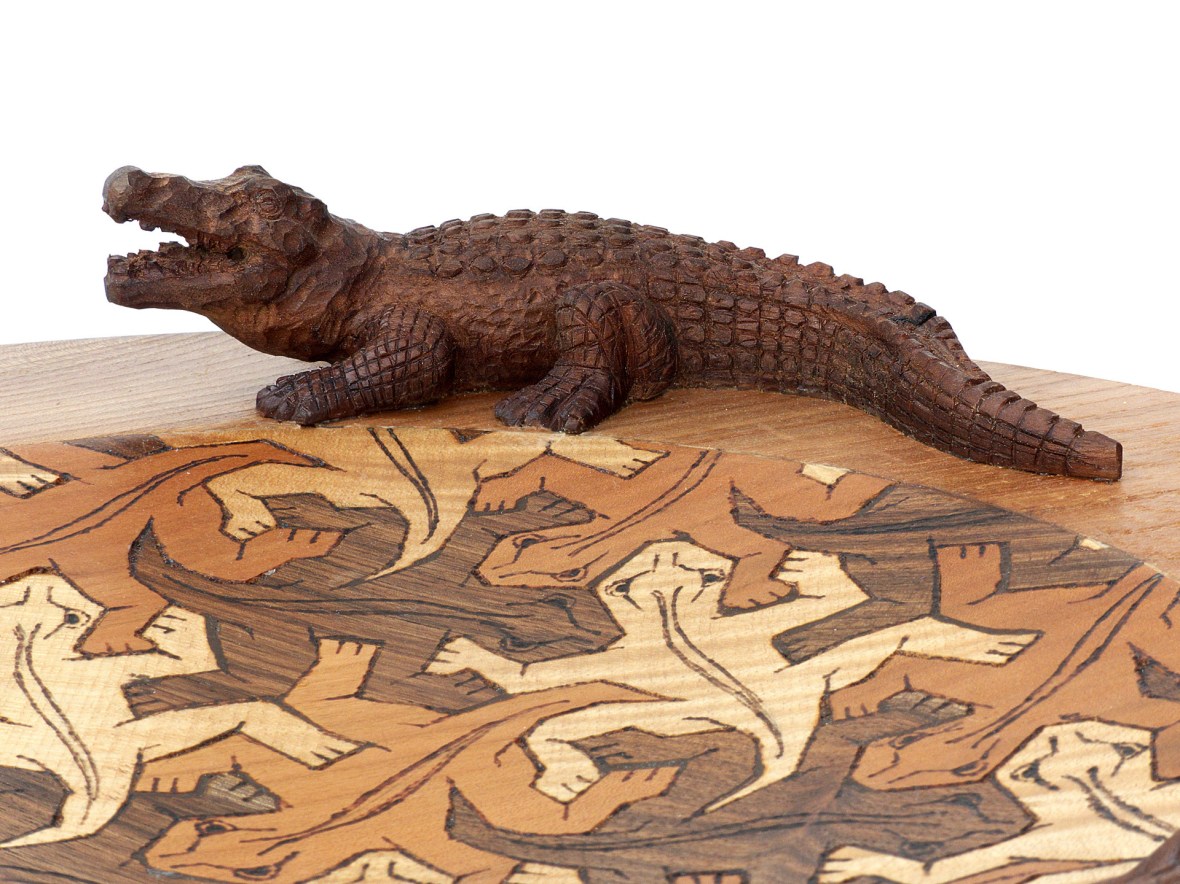
I have, for a long time, been fascinated by the work of the graphic artist M C Escher. His lithographs and woodcuts feature impossible constructions and images based on tessellating shapes and figures. His lithograph “Reptiles” (1943), in particular, lends itself to being reproduced in three dimensions as a wood carving.
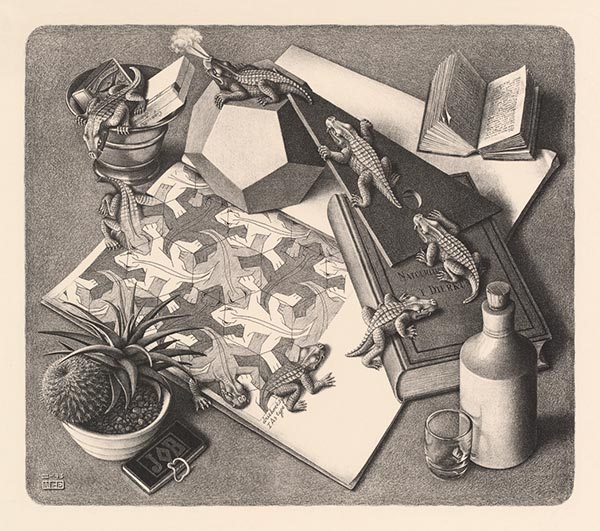
It features a drawing of his desk top with a book opened at a page of tessellating lizards from which a creature emerges. It then metamorphoses into a crocodile which climbs over the objects on the desk before disappearing back into the picture.
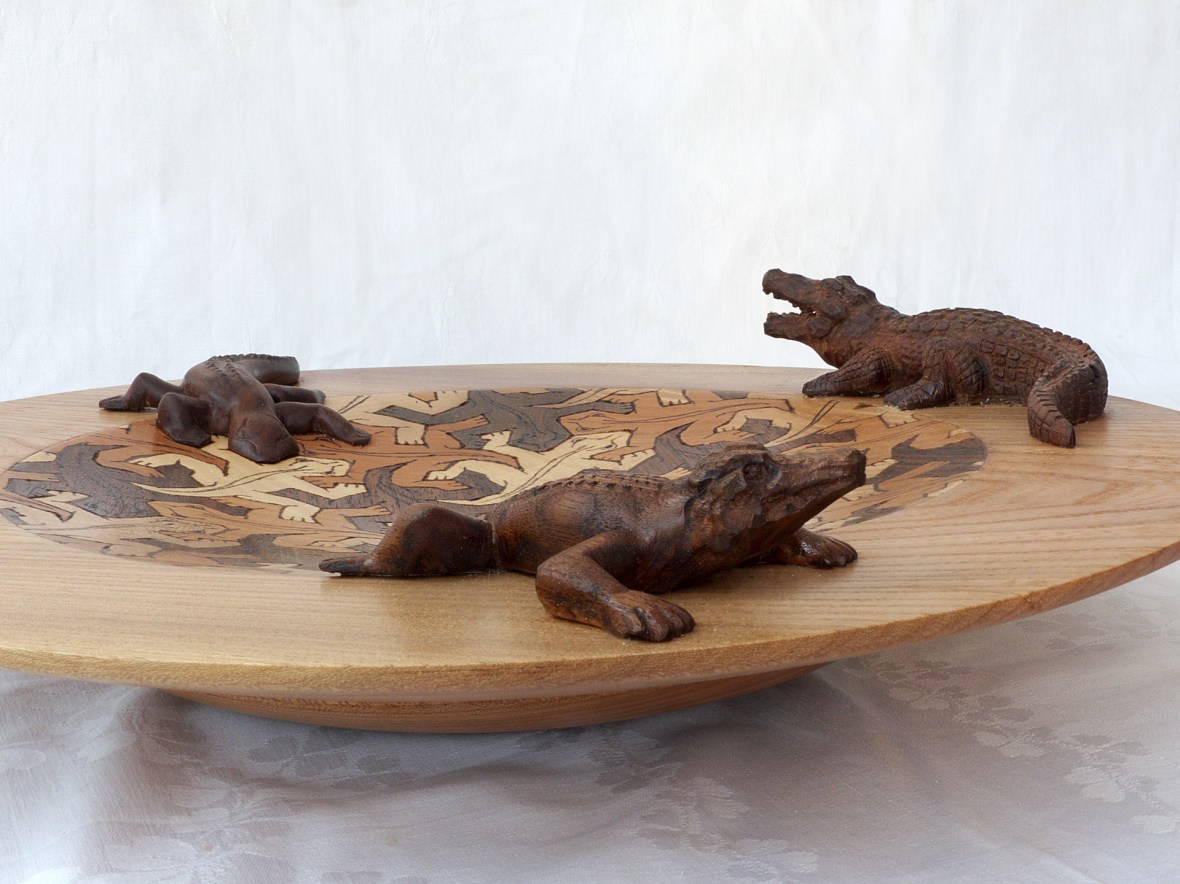
I resolved to use the idea as the basis of a carving of a crocodile which emerges from a bowl of tessellating lizards.
How?
Lacking the skills and equipment to turn a bowl of any size, let alone one with a diameter of 42cm, I approached local wood turner, Jack Foreman, who agreed to help. This still left me with the problem of the lizards.
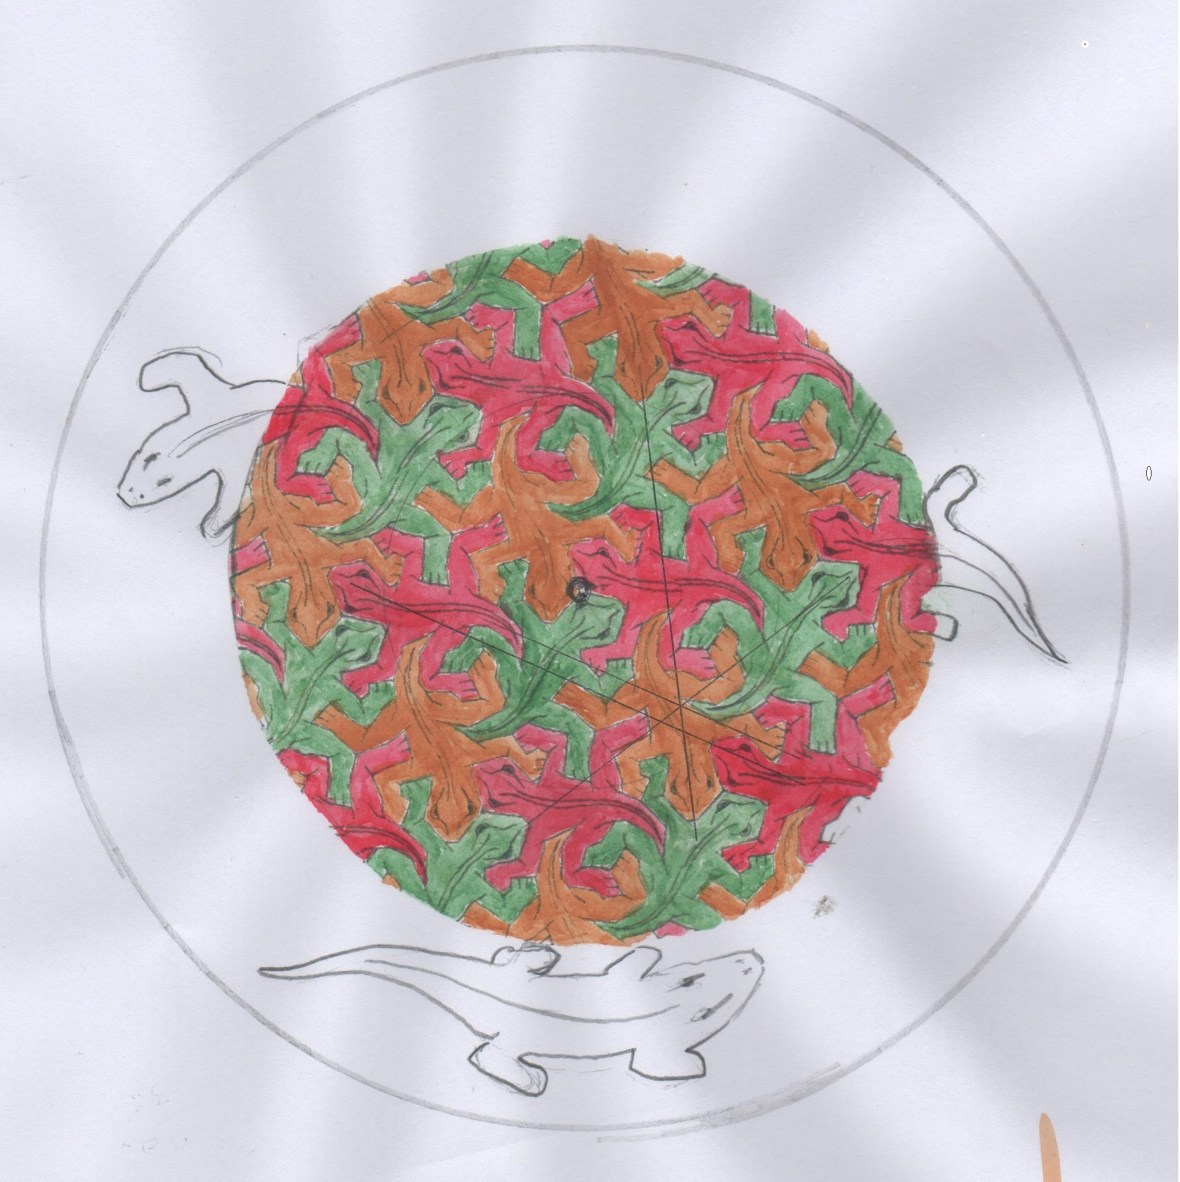
The idea was to make a circular jigsaw of lizards in three woods (walnut, cherry and sycamore) which could then be let into the bowl. Sizing was important as the lizards needed to radiate from the centre and eventually reach the edge in such a way that two of them could emerge onto the rim of the bowl in the right position. Images of the lizards were cut and pasted and endlessly photocopied, enlarged and reduced until a working template was established.
All that was needed now was to reproduce it in wood!!!
This needed to be 3cm. thick so that the dish of the bowl could eventually be turned. The image of the lizard, once printed out, could be glued to the wood and cut out.

Easier said than done! My scroll saw was not up to the job but eventually I found that I could make a reasonable job of it with the narrow bladed band saw.
Now the problems started! I could just about make two lizards fit together but there was no way that the third was even close. The problem was that the slightest error in one was magnified many times in the adjacent one and if continued would be compounded so much that by the time I got to the edge, it would become unrecognisable as a lizard. The problem was eventually resolved by extensive use of the photocopier. Each time a lizard was added I photocopied the resulting block.


This image was then superimposed onto the much copied working template and the next lizard adjusted so that it would fit the template. Eventually I finished the core of the bowl. The lizards were by no means identical but at least they were lizards even if some of them had very fat thighs!
So it was back to Jack who turned the bowl in elm and let in the block of thirty or so lizards that made up the centre of the bowl. All that remained to finish the bowl itself was to outline the lizards and add detail using a pyrograph. Any imperfections in the joins could be filled with coloured wax once the bowl was finished and oiled.
Carving the Crocodiles
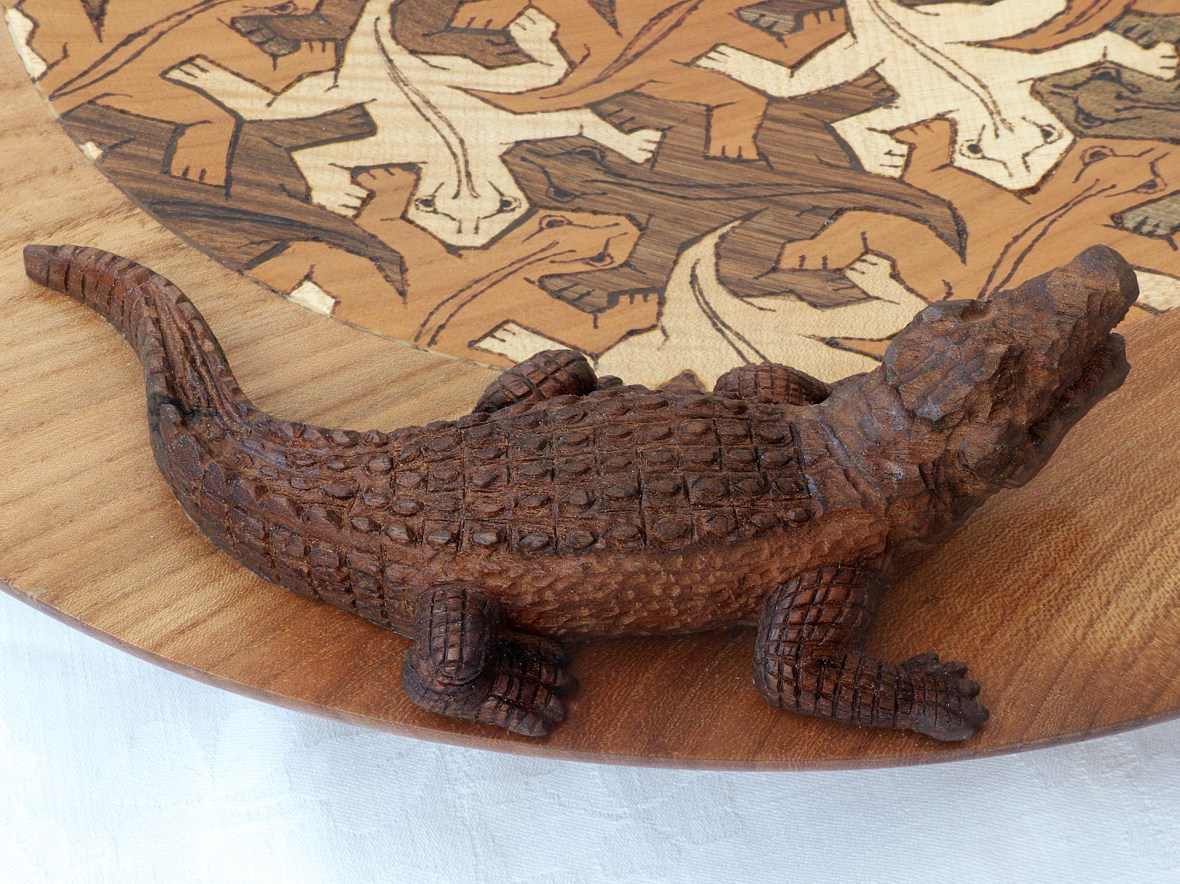
The next things to consider were the three crocodiles that were to go on the rim. It is important to really understand your subject and I always use a maquette but this time, rather than make one I bought a plastic model from a toy shop.
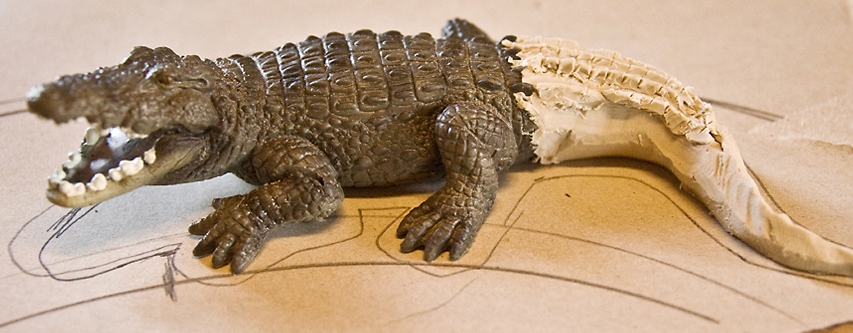
A little “plastic” surgery allowed it to fit the rim and I was ready to begin carving.
The basic outline of the main figure was cut out of a piece of walnut on the band saw and glued to a block of pine for clamping. A piece of thin card between the surfaces when gluing enabled the finished piece to be easily removed from the clamping block without damage.
The two intermediate figures posed more of a problem. The underside of the wood had to be made to fit the bowl. After making a rough fit, chalk was applied to the surface of the bowl and the piece of walnut offered up to it. High spots were thus identified and removed and eventually, after much repetition, a snug fit was obtained. I was able to use my photocopied images to accurately mark out the shapes which were then cut out on the band saw. To mount the pieces onto a clamping block I first glued a thin sheet of card to the underside of the walnut and then fixed it to the block with car body filler. This took up the shape of the walnut and enabled me to carve without damaging the chisel.

Carving the intermediate figures was relatively easy as they did not require a lot of detail apart from the head of the emerging crocodile. The main figure was more of a challenge but the accurate maquette was a great help with the various scale patterns. The open jaws were left to last and I was quite pleased with the finished result. It has to be said, though, that I would never have completed it without the continued help and support of my tutor, Mike Painter.
Reflections
Lessons learned? Always resource more wood than you think you require. Some of the colour matches are not good since I had to buy replacement wood halfway through the project. Choose something simpler next time!!!!